
[s197] Drgająca maska (pokrywa silnika)
Moderatorzy: mcgan, Pavulon_, pluzz, Rezor, stang232, celibad

[quote:ae5c27a0d9="Radek"][quote:ae5c27a0d9="LIZZARD"]na pewno nie da w ryja  [/quote:ae5c27a0d9]
Zakład [/quote:ae5c27a0d9]
Chyba pogrzebowy
[ [i:ae5c27a0d9][b:ae5c27a0d9]Dodano[/b:ae5c27a0d9]: 2008-11-18, 16:51[/i:ae5c27a0d9] ][/size:ae5c27a0d9]
[quote:ae5c27a0d9="alfatech"]ale jak napisał Lizzard i tak będzie latać ............... a może jakoś to usztywnić ?
  tzn maskę usztywnić ?:P[/quote:ae5c27a0d9]
Mam pomysł i muszę go kontynuować bo to drganie mnie po prostu fqrwia. Otóż maskę albo należy dociążyć od wewnątrz w tych miejscach tzn. gdzieś na wysokości kopuł zawiesia. np. podwieszonymi kieszeniami z ołowiem albo zamocować dobrane zaczepy zatrzaskowe otwierane linką od wewnątrz , albo zabudować 2 (nawiercanie dużych otworów w masce) żebrowane wyloty powietrza, tak miałem w Camaro, na razie kombinuję 
Zakład
Chyba pogrzebowy
[ [i:ae5c27a0d9][b:ae5c27a0d9]Dodano[/b:ae5c27a0d9]: 2008-11-18, 16:51[/i:ae5c27a0d9] ][/size:ae5c27a0d9]
[quote:ae5c27a0d9="alfatech"]ale jak napisał Lizzard i tak będzie latać
Mam pomysł i muszę go kontynuować bo to drganie mnie po prostu fqrwia. Otóż maskę albo należy dociążyć od wewnątrz w tych miejscach tzn. gdzieś na wysokości kopuł zawiesia. np. podwieszonymi kieszeniami z ołowiem
Jedyny alkohol jaki obecnie mogę spożywać to Piña colada...
-
Kluczyk
- Młodszy Forumowicz
- Posty: 10
- Rejestracja: 2008-09-08, 23:44
- Model: GT 2007
- Silnik: V8 4.6
- Kolor: czerwony
[quote:ee2d13ad60="SeaBiscuit"][quote:ee2d13ad60="Pawellos"]No, ale odleciała już komuś czy tylko drga? 
Też tak mam, zauważyłem to zaraz po odebraniu samochody na płatnej A2 i serio przy 150, to nie problem, pojedz w okolicach VMAX [/quote:ee2d13ad60]
Raz mi się zerwała z pierwszego zaczepu przy 180km/h było fajowo[/quote:ee2d13ad60]
Mi tez sie raz zerwala z zaczepu przy ok 180-190 km/h...
Też tak mam, zauważyłem to zaraz po odebraniu samochody na płatnej A2 i serio przy 150, to nie problem, pojedz w okolicach VMAX
Raz mi się zerwała z pierwszego zaczepu przy 180km/h było fajowo
Mi tez sie raz zerwala z zaczepu przy ok 180-190 km/h...
-
Little Pony

- Forumowicz
- Posty: 121
- Rejestracja: 2008-10-30, 21:53
- Model: yhm.... :)
- Silnik: inny V6
O w morde... tzn mam nadzieje ze nie w morde Jak rozumiem drugi trzymal i do niczego groznego nie doszlo? Chyba mi sie odechcialo sciagac ograniczenie predkosci
Był ale się rozbił: Mustang GT 2005 Convertible, Dodge Charger R/T 2006
I'm gonna put on a iron shirt, and chase all muscle cars out of earth!
I'm gonna put on a iron shirt, and chase all muscle cars out of earth!
-
Kluczyk
- Młodszy Forumowicz
- Posty: 10
- Rejestracja: 2008-09-08, 23:44
- Model: GT 2007
- Silnik: V8 4.6
- Kolor: czerwony
[quote:77524ad2e8="Little Pony"]O w morde... tzn mam nadzieje ze nie w morde Jak rozumiem drugi trzymal i do niczego groznego nie doszlo? Chyba mi sie odechcialo sciagac ograniczenie predkosci [/quote:77524ad2e8]
Na szczescie nic sie nie stalo, ale stresik lekki przezylem. Nie wiem czy po prostu maska byla wtedy zle domknieta, czy to rzeczywiscie blad konstrukcyjny Myslalem o zalozeniu PINow podobnych do tych co Alfatech znalazl, tylko szkoda dziury wiercic w masce.
bo te chyba raczej nie pomoga
http://www.americanmuscle.com/hopinapkit.html" onclick="window.open(this.href);return false;
Na szczescie nic sie nie stalo, ale stresik lekki przezylem. Nie wiem czy po prostu maska byla wtedy zle domknieta, czy to rzeczywiscie blad konstrukcyjny
bo te chyba raczej nie pomoga
http://www.americanmuscle.com/hopinapkit.html" onclick="window.open(this.href);return false;
-
Pawellos
- Forumowicz
- Posty: 299
- Rejestracja: 2008-09-23, 03:09
- Model: 2009 Mustang GT
- Silnik: V8 4.6
- Kolor: Candy Apple Red
[quote:840a94e236="celibad"]kupiłem Diablo Predatora .... działa bez zarzutu .... miałem dwa te urządzenia , jedno sprzedałem Alfatechowi
Teraz jedzie szybciej , ale nie wiem ile , bo obroty rosną a wskazówka szbkościomierza stoi dalej na 185 hehe .... wezme kiedys nawigacje i sprawdze ile jedzie , ale na moje oko jechałem na obwodnicy Oleśnicy z 220[/quote:840a94e236]
A jak to się na spalaniu odbija?;]
Ktoś wie jak idzie V8 bez ogranicznika?
-
alfatech
- Forumowicz
- Posty: 342
- Rejestracja: 2008-07-08, 14:17
- Model: 2005 DżiTi
- Silnik: V8 4.6
- Kolor: Czrny XTRMNTR
- Lokalizacja:: Koło
- Kontakt:
[quote:da40c11945="Kluczyk"]Mi tez sie raz zerwala z zaczepu przy ok 180-190 km/h...[/quote:da40c11945] kurde następna kaszana forda
mnie też jakoś się nie chce wiercić dziur w masce nie tyle nie chce co szkoda dziurawić .................. ale jak ma mi się macha otworzyć przy 200 km/h to dziękuję
Na allegro jest tego parę sztuk http://www.allegro.pl/search.php?string ... &country=1" onclick="window.open(this.href);return false; na pewno coś podpasuje ..................... ale to wiercenie i dziury [quote:da40c11945="Pawellos"]A jak to się na spalaniu odbija?;] [/quote:da40c11945] mnie pali więcej .......... ale też szybciej jeżdżę niż bez predatora
mnie też jakoś się nie chce wiercić dziur w masce
Na allegro jest tego parę sztuk http://www.allegro.pl/search.php?string ... &country=1" onclick="window.open(this.href);return false; na pewno coś podpasuje ..................... ale to wiercenie i dziury
Pozdrawiam
Tomek http://www.alfa-tech.com.pl/kontakt/
Tomek http://www.alfa-tech.com.pl/kontakt/
-
Pawellos
- Forumowicz
- Posty: 299
- Rejestracja: 2008-09-23, 03:09
- Model: 2009 Mustang GT
- Silnik: V8 4.6
- Kolor: Candy Apple Red
[quote:6bda9f8a9a="alfatech"]
Na allegro jest tego parę sztuk http://www.allegro.pl/search.php?string ... &country=1" onclick="window.open(this.href);return false; na pewno coś podpasuje .....................
[/quote:6bda9f8a9a]
Bierz te, będą najlepsze
http://www.allegro.pl/item486536382_wyp ... _2szt.html" onclick="window.open(this.href);return false;
[ [i:6bda9f8a9a][b:6bda9f8a9a]Dodano[/b:6bda9f8a9a]: 2008-11-19, 10:07[/i:6bda9f8a9a] ][/size:6bda9f8a9a]
[quote:6bda9f8a9a="alfatech"][quote:6bda9f8a9a="Pawellos"]A jak to się na spalaniu odbija?;] [/quote:6bda9f8a9a] mnie pali więcej .......... ale też szybciej jeżdżę niż bez predatora[/quote:6bda9f8a9a]
A ile palił wcześniej a ile teraz?
Na allegro jest tego parę sztuk http://www.allegro.pl/search.php?string ... &country=1" onclick="window.open(this.href);return false; na pewno coś podpasuje .....................
[/quote:6bda9f8a9a]
Bierz te, będą najlepsze
http://www.allegro.pl/item486536382_wyp ... _2szt.html" onclick="window.open(this.href);return false;
[ [i:6bda9f8a9a][b:6bda9f8a9a]Dodano[/b:6bda9f8a9a]: 2008-11-19, 10:07[/i:6bda9f8a9a] ][/size:6bda9f8a9a]
[quote:6bda9f8a9a="alfatech"][quote:6bda9f8a9a="Pawellos"]A jak to się na spalaniu odbija?;] [/quote:6bda9f8a9a] mnie pali więcej .......... ale też szybciej jeżdżę niż bez predatora
A ile palił wcześniej a ile teraz?


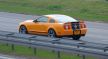
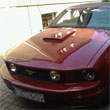
Tego typu maska pozbawi nas drgawek
[img:8ad7ad3727]http://img19.imagesbit.com/out.php?i=33842_gtsunder.jpg[/img:8ad7ad3727][img:8ad7ad3727]http://img14.imagesbit.com/out.php?i=33843_hoods.jpg[/img:8ad7ad3727][img:8ad7ad3727]http://img16.imagesbit.com/out.php?i=33844_hoods2.jpg[/img:8ad7ad3727]
[img:8ad7ad3727]http://img19.imagesbit.com/out.php?i=33842_gtsunder.jpg[/img:8ad7ad3727][img:8ad7ad3727]http://img14.imagesbit.com/out.php?i=33843_hoods.jpg[/img:8ad7ad3727][img:8ad7ad3727]http://img16.imagesbit.com/out.php?i=33844_hoods2.jpg[/img:8ad7ad3727]
Jedyny alkohol jaki obecnie mogę spożywać to Piña colada...
-
Olaf

- Forumowicz
- Posty: 436
- Rejestracja: 2008-07-09, 21:57
- Model: GT 2005
- Silnik: V8 4.6
- Kolor: królewski błękit : )
- Lokalizacja:: Warszawa
- Stajnia: Stajnia Mazowiecka
no fakt u mnie "seryjnie" przy 220km też maska furczała, ale odkręciłem odbojniki całkiem mocno i luzik, już nie lata.... tylko żeby zamknąć maskę to trzeba nią nieźle pierdolnąć...
i fakt, autko trochę jakby tyłem podskakuje, buja się, w ogóle powyżej 220km jest jakby trochę niestabilne - tylko nie wiem czy to polskie drogi "ekspresowe" są tak połałdowane czy żeczywiście to auto...
i fakt, autko trochę jakby tyłem podskakuje, buja się, w ogóle powyżej 220km jest jakby trochę niestabilne - tylko nie wiem czy to polskie drogi "ekspresowe" są tak połałdowane czy żeczywiście to auto...
[quote:f8338419d8="Olaf"] u mnie "seryjnie" przy 220km też maska furczała, ale odkręciłem odbojniki całkiem mocno i [b:f8338419d8]luzik, już nie lata....[/b:f8338419d8][/quote:f8338419d8]
[quote:f8338419d8="Olaf"] i fakt, autko trochę jakby tyłem podskakuje, buja się, w ogóle powyżej 220km jest jakby trochę niestabilne - tylko nie wiem czy to polskie drogi "ekspresowe" są tak połałdowane czy żeczywiście to auto...[/quote:f8338419d8]
A ja mam krańcowo odmienne zdanie, bo u mnie jak po szynach jedzie niewzruszony i to przy gps'owej 250 km/h, na autostradzie ma się rozumieć. A wracając na chwilkę do odbojów, to nie można przesadzać z ich wykręcaniem, bowiem alu macha jest "miękka" i buły mogą wyskoczć, zresztą sprawdź czy już ich nie masz, kucnij od strony reflektorów i popatrz... i co zobaczyłeś jestem ciekaw. Zakańczając , mi podkręcenie odbojników nic nie pomogło 
[quote:f8338419d8="Olaf"] i fakt, autko trochę jakby tyłem podskakuje, buja się, w ogóle powyżej 220km jest jakby trochę niestabilne - tylko nie wiem czy to polskie drogi "ekspresowe" są tak połałdowane czy żeczywiście to auto...[/quote:f8338419d8]
A ja mam krańcowo odmienne zdanie, bo u mnie jak po szynach jedzie niewzruszony i to przy gps'owej 250 km/h, na autostradzie ma się rozumieć. A wracając na chwilkę do odbojów, to nie można przesadzać z ich wykręcaniem, bowiem alu macha jest "miękka" i buły mogą wyskoczć, zresztą sprawdź czy już ich nie masz, kucnij
Jedyny alkohol jaki obecnie mogę spożywać to Piña colada...
to co znalazlem - montaz:
-------------------------
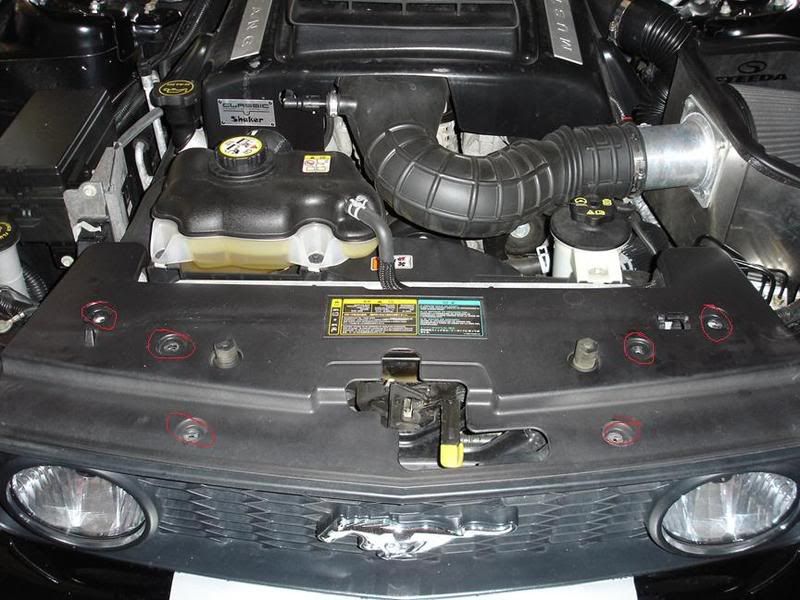
STEP 1:
Remove the 6 body pins that hold on the plastic radiator cover.
[img:91fc2641e4]http://img.photobucket.com/albums/v637/ ... /STEP1.jpg[/img:91fc2641e4]
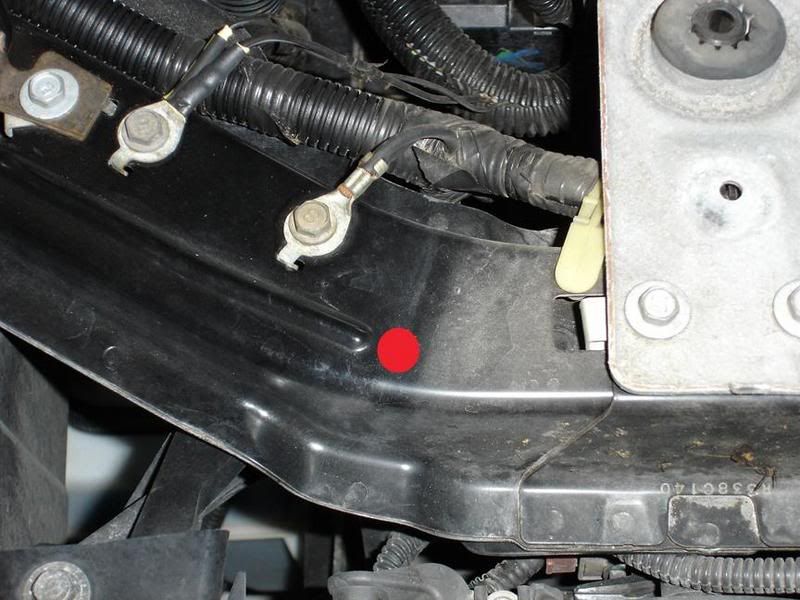
STEP 2:
There are 2 long seams in the support on the front rail. I used the inside ends on both sides to mark the spot for the hood pins. I started with a 1/4" hole then drilled the half inch hole.
[img:91fc2641e4]http://img.photobucket.com/albums/v637/ ... /STEP2.jpg[/img:91fc2641e4]
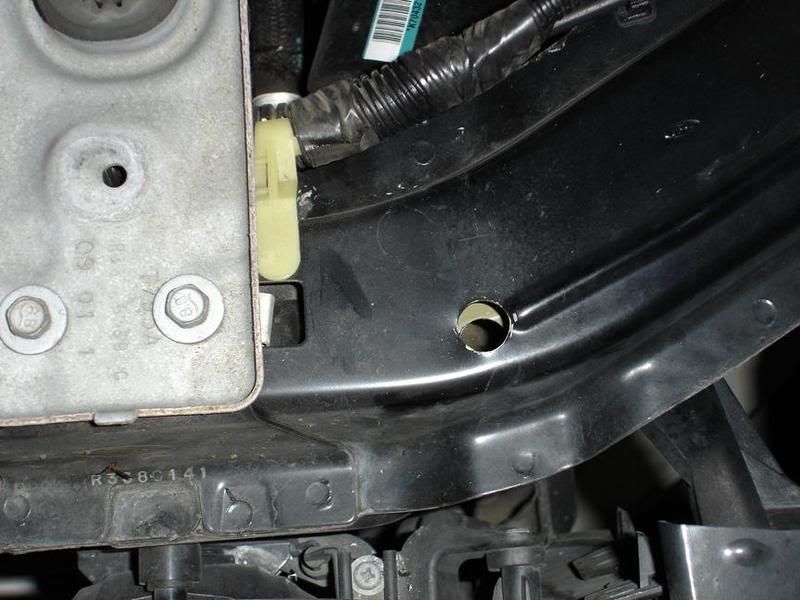
STEP 3:
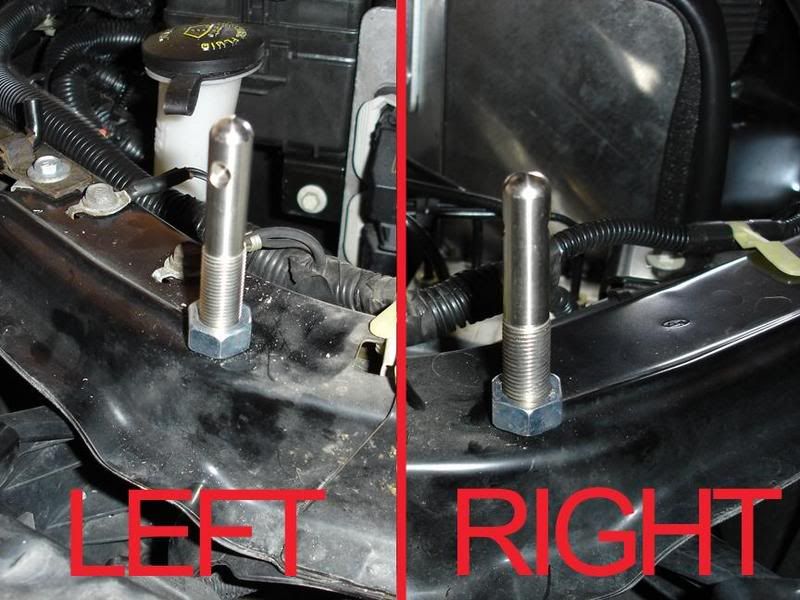
I placed the hood pins in the location, but don't tighten down yet. You are only using them to make the marks for the holes in the hood.
[img:91fc2641e4]http://img.photobucket.com/albums/v637/ ... /STEP3.jpg[/img:91fc2641e4]
STEP 4:
Tape the top side of the hood. I didn't know the exact spot so just guessed and covered a bigger area.
[img:91fc2641e4]http://img.photobucket.com/albums/v637/ ... /STEP4.jpg[/img:91fc2641e4]
STEP 5:
Remove the under hood liner. Due to the shaker hood, to remove mine would be huge task, so I simply taped it back.
[img:91fc2641e4]http://img.photobucket.com/albums/v637/ ... /STEP5.jpg[/img:91fc2641e4]
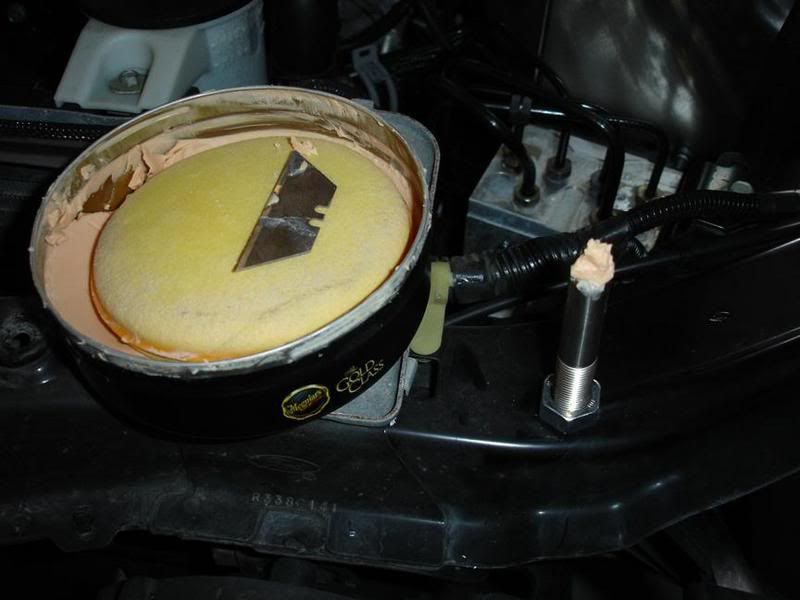
STEP 6:
Take some wax, peanut butter, grease, or whatever else you can find and place a small ball on top of the hood pin.
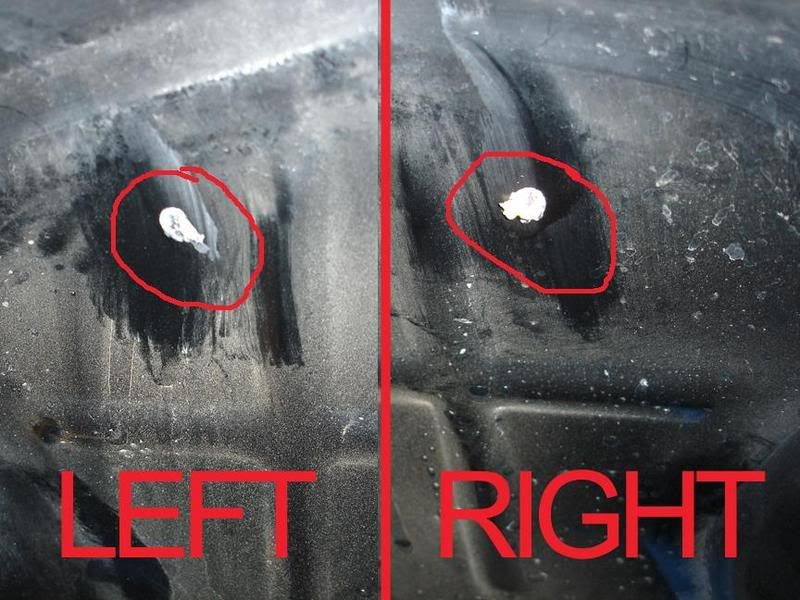
STEP 7:
Close the hood and press on both sides to allow the material from the hood pins to transfere to the underside of the hood.
STEP 8:
Drill from the bottom of the hood up. Start with the 1/4" bit and then the 1/2" bit.
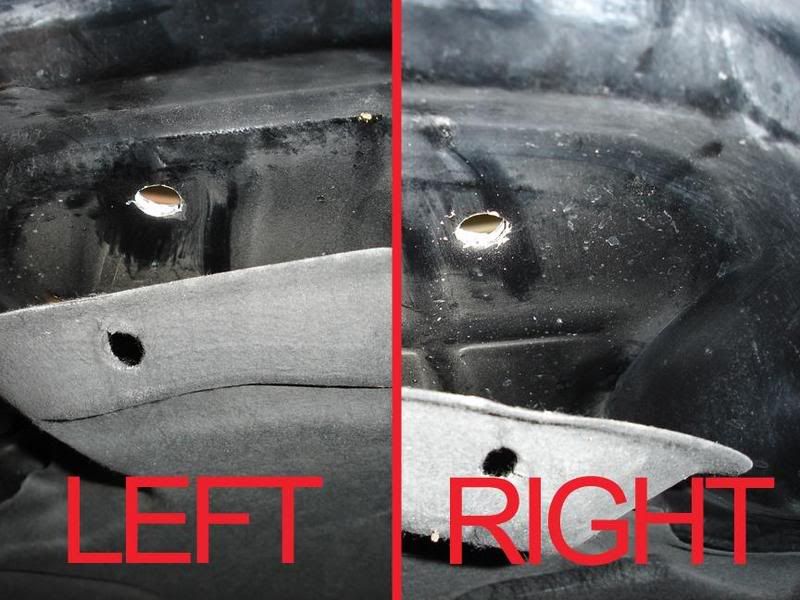
STEP 9:
Sorry no pics of this. Just forgot... But...
Remove all the tape,
Install the under hood liner,
Close the hood and the hood pins will start to press through the liner,
Press harder and they will pop through giving you a nice hole,
Open the hood and just pull the extra material out of the under hood liner.
Step 10:
You will notice the holes might need to be bigger here and there. Just do what you need to do and make the hood pins fit through the holes without rubbing. No art here, just make the hole bigger.
STEP 11:
After makeing the holes bigger and the pins now fitting through the hood, you will have to adjust the height of the pins. THEY DO FIT... The bottom nut will only be holding about 3-4 threads. So get it set at the right height and get an idea of that position. Now take the pins off the car and loctite in the proper order to reassemble. Once you have them reassemble tighten the top bolt with a 3/4" wrench. To keep the pin from moving place a screw driver through the hole in the top of the hood pin.
Step 12:
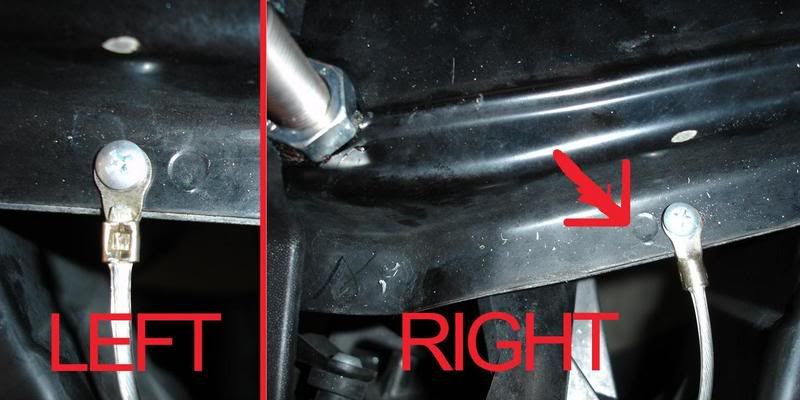
Locate the spot weld to the left/right of the hood pins. I made a spot next to them since they are the same on boths sides. I drilled an 1/8" hole there and screwed in the lanyard.
STEP 13:
Place the radiator cover back on and mark the spots that need to be cut out. Dremel away...
STEP 14:
I chose to run the lanyard under this part to get rid of a lot of the extra slack. Turned out nice.
STEP 15:
Forgot pics again, but pretty easy...
Close the hood up and place the steal plates over the pins on the hood. TIP: DO ONE HOLE AND SCREW AT A TIME... Hold the plate in place and drill a 1/8" hole in the first spot. Screw it down and then repeat. If you try and drill all 4 holes first it won't align right. TRUST ME!!!
STEP 16:
Some have had problems with there still not being enough of the hood pin showing. To fix the problem, just lower the bump stops evenly to allow for more space. This will take some trial and error but make sure that you do both sides evenly. If you lower them to much though, your hood will not align with the fenders properly, but 1/2-1 full turn shouldn't make it so noticeable.
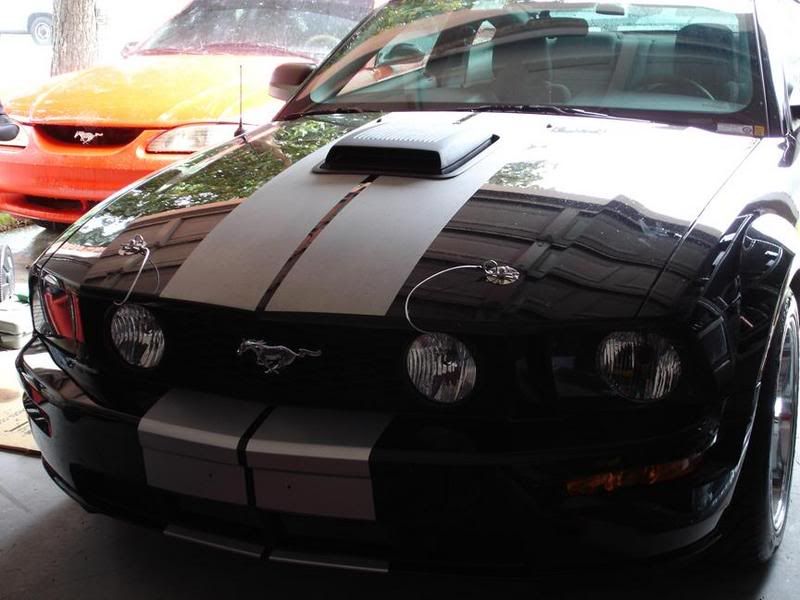
FINISHED PRODUCT!!!
[img:91fc2641e4]http://img.photobucket.com/albums/v637/ ... /STEP6.jpg[/img:91fc2641e4]
[img:91fc2641e4]http://img.photobucket.com/albums/v637/ ... /STEP7.jpg[/img:91fc2641e4]
[img:91fc2641e4]http://img.photobucket.com/albums/v637/ ... /STEP8.jpg[/img:91fc2641e4]
[img:91fc2641e4]http://img.photobucket.com/albums/v637/ ... /STEP9.jpg[/img:91fc2641e4][img:91fc2641e4]http://img.photobucket.com/albums/v637/ ... STEP10.jpg[/img:91fc2641e4]
[img:91fc2641e4]http://img.photobucket.com/albums/v637/ ... STEP11.jpg[/img:91fc2641e4]
[img:91fc2641e4]http://img.photobucket.com/albums/v637/ ... STEP12.jpg[/img:91fc2641e4][img:91fc2641e4]http://img.photobucket.com/albums/v637/ ... STEP13.jpg[/img:91fc2641e4]
[img:91fc2641e4]http://img.photobucket.com/albums/v637/ ... STEP14.jpg[/img:91fc2641e4]
-------------------------
STEP 1:
Remove the 6 body pins that hold on the plastic radiator cover.
[img:91fc2641e4]http://img.photobucket.com/albums/v637/ ... /STEP1.jpg[/img:91fc2641e4]
STEP 2:
There are 2 long seams in the support on the front rail. I used the inside ends on both sides to mark the spot for the hood pins. I started with a 1/4" hole then drilled the half inch hole.
[img:91fc2641e4]http://img.photobucket.com/albums/v637/ ... /STEP2.jpg[/img:91fc2641e4]
STEP 3:
I placed the hood pins in the location, but don't tighten down yet. You are only using them to make the marks for the holes in the hood.
[img:91fc2641e4]http://img.photobucket.com/albums/v637/ ... /STEP3.jpg[/img:91fc2641e4]
STEP 4:
Tape the top side of the hood. I didn't know the exact spot so just guessed and covered a bigger area.
[img:91fc2641e4]http://img.photobucket.com/albums/v637/ ... /STEP4.jpg[/img:91fc2641e4]
STEP 5:
Remove the under hood liner. Due to the shaker hood, to remove mine would be huge task, so I simply taped it back.
[img:91fc2641e4]http://img.photobucket.com/albums/v637/ ... /STEP5.jpg[/img:91fc2641e4]
STEP 6:
Take some wax, peanut butter, grease, or whatever else you can find and place a small ball on top of the hood pin.
STEP 7:
Close the hood and press on both sides to allow the material from the hood pins to transfere to the underside of the hood.
STEP 8:
Drill from the bottom of the hood up. Start with the 1/4" bit and then the 1/2" bit.
STEP 9:
Sorry no pics of this. Just forgot... But...
Remove all the tape,
Install the under hood liner,
Close the hood and the hood pins will start to press through the liner,
Press harder and they will pop through giving you a nice hole,
Open the hood and just pull the extra material out of the under hood liner.
Step 10:
You will notice the holes might need to be bigger here and there. Just do what you need to do and make the hood pins fit through the holes without rubbing. No art here, just make the hole bigger.
STEP 11:
After makeing the holes bigger and the pins now fitting through the hood, you will have to adjust the height of the pins. THEY DO FIT... The bottom nut will only be holding about 3-4 threads. So get it set at the right height and get an idea of that position. Now take the pins off the car and loctite in the proper order to reassemble. Once you have them reassemble tighten the top bolt with a 3/4" wrench. To keep the pin from moving place a screw driver through the hole in the top of the hood pin.
Step 12:
Locate the spot weld to the left/right of the hood pins. I made a spot next to them since they are the same on boths sides. I drilled an 1/8" hole there and screwed in the lanyard.
STEP 13:
Place the radiator cover back on and mark the spots that need to be cut out. Dremel away...
STEP 14:
I chose to run the lanyard under this part to get rid of a lot of the extra slack. Turned out nice.
STEP 15:
Forgot pics again, but pretty easy...
Close the hood up and place the steal plates over the pins on the hood. TIP: DO ONE HOLE AND SCREW AT A TIME... Hold the plate in place and drill a 1/8" hole in the first spot. Screw it down and then repeat. If you try and drill all 4 holes first it won't align right. TRUST ME!!!
STEP 16:
Some have had problems with there still not being enough of the hood pin showing. To fix the problem, just lower the bump stops evenly to allow for more space. This will take some trial and error but make sure that you do both sides evenly. If you lower them to much though, your hood will not align with the fenders properly, but 1/2-1 full turn shouldn't make it so noticeable.
FINISHED PRODUCT!!!
[img:91fc2641e4]http://img.photobucket.com/albums/v637/ ... /STEP6.jpg[/img:91fc2641e4]
[img:91fc2641e4]http://img.photobucket.com/albums/v637/ ... /STEP7.jpg[/img:91fc2641e4]
[img:91fc2641e4]http://img.photobucket.com/albums/v637/ ... /STEP8.jpg[/img:91fc2641e4]
[img:91fc2641e4]http://img.photobucket.com/albums/v637/ ... /STEP9.jpg[/img:91fc2641e4][img:91fc2641e4]http://img.photobucket.com/albums/v637/ ... STEP10.jpg[/img:91fc2641e4]
[img:91fc2641e4]http://img.photobucket.com/albums/v637/ ... STEP11.jpg[/img:91fc2641e4]
[img:91fc2641e4]http://img.photobucket.com/albums/v637/ ... STEP12.jpg[/img:91fc2641e4][img:91fc2641e4]http://img.photobucket.com/albums/v637/ ... STEP13.jpg[/img:91fc2641e4]
[img:91fc2641e4]http://img.photobucket.com/albums/v637/ ... STEP14.jpg[/img:91fc2641e4]

Wystarczy je założyć zgodnie z instrukcją i maska ani drgnie przy 240km/h pisałem o tym ale fachowcy co ich nie zamontowali i nie przetestowali mają tu lepsze zdanie na ten temat - luźne zawiasy 
[img]http://i938.photobucket.com/albums/ad230/RedHornet_PL/Avatar/Avatar-Stripe-5-ANIM.gif[/img]
Best 1/4 ET 12,89
Best 1/4 ET 12,89